|
|
For users who are members of more than one security group, the administrator must assign the user a separate user code, database-user name, and database password for each group.
|
|
1
|
From the Voyager System Administration side menu, select Security > Add Users. The User Security screen appears, displaying the Privileges tab.
|

Code Type a code for the user. You cannot use the same code as a user in another security group. If the same user belongs to another group, you must create a different code for this user in that group.
Group Type or select a group. This selection assigns the user to one of the security groups that you previously added. The user inherits all system rights and menu-task permissions that you assign to the security group.
Property Type or select a property or property list. This option limits the user's access to only the data and financial transactions associated with the designated property or properties. This option also restricts the user from adding any other new properties to the database. Leave this field empty if you want to permit the user to access all properties.
E-mail Type the user's e-mail address.
Style Sheet If you want to define the colors and format of the menus and screens accessed by the user, select a default style sheet. Leave this field empty to leave as-is the default style sheet colors and format. This user selection overrides the style sheet settings in other locations, such as on the Security Group and Accounts and Options screens.
Header Image If you want to replace the standard Voyager menu header graphic with a custom image, select the image file. You can use standard GIF, JPG, and PNG-format graphics files. The new header will appear above the title menu on all menu screens for this user.
Collapse Side Menu Select this check box if you want to minimize the side menu on all menu screens that are accessed by the user. If you activate this option, the user can always manually expand the side menu, as needed.
|
3
|
In the Login section, complete the following fields:
|
User Name Type the name that you assign to the user for logging on to this Voyager database. Voyager will also use this name to identify reports that are generated by the user.
If you activate Microsoft Active Directory Authentication features on the Voyager Accounts and Options screen, you must type the user name in the Microsoft Active Directory format (for example, username@domainname). If you click the underlined user name link, a lookup list of authenticated user names appears. Select a user from the list, and then click OK.
|
|
Password Type a personal password for the user. The user will type this password when logging on to this Voyager database.
|
|
If you set up, on the Voyager Accounts and Options screen, the Enable Password Complexity rules for the database, you must add a password that complies with those rules. For more information about setting password complexity rules, see “Passwords” in the Voyager Core Setup Guide. For more information about password-naming protocols and logon security for your organization, contact your system or database administrator.
|
After the system administrator activates Microsoft Active Directory Authentication on the Voyager Accounts and Options screen, the Password field label changes to Pmuser password. In this case, type the user's Active Directory password.
Password Last Changed This field records the date when the user's password changes. For new users, you can leave this field empty.
For new users, Voyager uses the system date as the start date. The password expires after the number of days displayed in the Password Expiration Period field. When a user's password changes, Voyager automatically enters the change date in the Password Last Changed field and uses that as the start date.
Password Expiration Period Type the number of days that Voyager permits the user's password to remain unchanged. The default is zero (0), in which case the user's password never expires. If you change this setting, Voyager displays an error message to the user after the password expires. The user must then contact an administrator for assistance, unless the user has permissions to change their own password.
Force Password Expiration Select this check box if you want to force the user to change their password the next time that they log on to Voyager.
|
4
|
In the Database section, complete the following fields:
|
User Name Type the name of the database administrative user (DBO) that you created when you added Yardi administrative security.
Password Type the password for the database administrative user (DBO) that you created when you added Yardi administrative security.
|
|
|
5
|
On the Privileges tab, complete the following fields:
|
Access to Past Periods Type the number of months in the past (preceding the operating month) for which the user is permitted to post transactions. The default is zero (0), which permits the user to only post transactions in the current month.
Access to Future Periods Type the number of months in the future (following the operating month) for which the user is permitted to post transactions. The default is zero (0), which permits the user to only post transactions in the current month.
View payroll trans Select this check box to permit the user to view timesheet invoices added in Yardi Payroll. This option only applies to Yardi Payroll. For more information, see the Yardi Payroll User's Guide.
View all financial batches Select this check box to permit the user to view all financial batch transactions. If this check box is clear, the user can only view transactions added to the database under their own user name. The results of this setting also depend on the Property field, preceding; if the option is clear, the user the user can only view transactions added to the database under their own user name.
View all Conductor reports Select this check box to permit the user to view all report batches in the Yardi Conductor utility. If this check box is clear, the user can only view the batch reports added under their own user name. In this case, the Yardi Conductor Distribution Manager utility processes only that user's report batches. For more information about Yardi Conductor, see the Yardi Conductor Setup and Administration Guide.
View secured attachments Select this check box to permit the user to view all external files that are secure attachments to records. If this check box is clear, the user cannot view secured attachments.
Post to control account Typically, Voyager automatically posts to control accounts, as these accounts are linked to other G/L accounts for transactions. Select this check box if you want to permit the user to add journal entries for these control accounts. If the check box is clear, the user cannot manually add control accounts on transactions, and control accounts do not appear on account selection lists for this user.
Read Only Select this check box to grant the user read-only access to database information. The user cannot modify or edit the database. This option applies to all Voyager system screens and procedures.
Interface User Select this check box to permit the user to have access to Voyager interfaces. Voyager permits the user to log on to only those Voyager interfaces for which they are licensed. For more information about Voyager interfaces, contact Yardi technical support.
Edit Web Content Select this check box to permit the user to edit Web content related to your organization's website. This field applies only if you are using Yardi Portal. For more information about Yardi Portal, contact Yardi technical support.
Approve Web Content Select this check box to permit the user to approve Web content that was edited by other users. Use this option when you want to include property-management information on your organization's Internet website. This field applies only if you are using Yardi Portal. For more information about Yardi Portal, contact Yardi technical support.
User can bypass Leasing Week security Select this check box to permit the user to perform all residential move-in and move-out tasks for any period, whether or not the transaction date occurs in a closed leasing week. This field applies to residential leasing weeks only. For more information, see “Move-In Procedures” and “Move-Out Procedures” in the Voyager Residential User's Guide.
Receive License Messages BEFORE expiration date If you want Voyager to display a warning message to the user before the Voyager software license expires, select this check box. Clear this check box if you do not want the user to receive warning messages before license expiration.
|
|
Receive License Messages AFTER expiration date If you want Voyager to display a warning message to the user after the Voyager software license expires, select this check box. Clear this check box if you do not want the user to receive warning messages after license expiration.
Receive Stack Trace Messages Select this check box to permit the user to view stack-trace messages issued by Voyager for application-error conditions. These messages are associated with Microsoft .NET operations and screens. For more information about stack-trace error messages, contact your system or database administrator, or Yardi technical support.
Inactive User Select this check box to change the user status to Inactive. Inactive users are unable to log on to Voyager; however, they do not count against your Voyager software license-allocation for users.
|
6
|
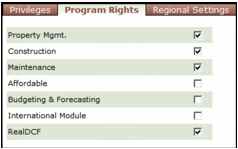
Click the Program Rights tab.
|
|
|
|
8
|
Click the Regional Settings tab.
|
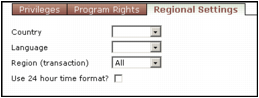
Country Select the country format.
Language Select the language for your region.
Region (transaction) Select your region for transaction purposes.
Use 24-hour time format Select this check box to set Voyager system time values to 24-hour format (for example, 0000 to 2400).
|
10
|
Click Save.
|
|
11
|
If you want to add more users to the security group, click New and repeat this procedure.
|