You can set up a report packet for lease documents, which is a single PDF document comprised of the documents that your organization requires for signing or renewing leases--resident contracts, move-in statements, and so on. For more information, see “Report Packets” in the Yardi Service Manager Installation and Setup Guide.
|
|
In order to set up report packets, you must clear the Lease Document field in the Property Documents section on the Property Control screen. For more information, see “Working with Property Records” in the Voyager Core Setup Guide.
|
|
|
In order to generate lease documents for new leases, users click the Lease Doc button on the Prospect Guest Card screen after approving an applicant's lease. In order to generate lease documents for renewals, users click the Lease Doc button in the row corresponding to a resident on the Schedule Lease Renewals -- [Current Date] tab on the Community Manager Dashboard. Your server must be running Yardi Conductor for these buttons to function. For more information, see the Yardi Conductor Setup and Administration Guide.
|
|
1
|
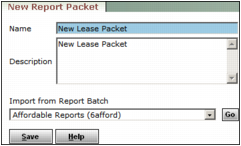
From the side menu, select Admin > Report Scheduler > Add Report Packet. The New Report Packet screen appears.
|
|
2
|
|
|
|
3
|
|
4
|
|
6
|
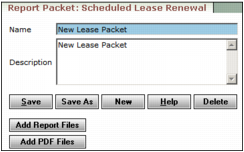
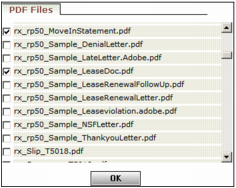
Click OK. The PDF Files screen closes. On the Report Packet: [Packet Name] screen, additional fields appear.
|
|
7
|
|
8
|
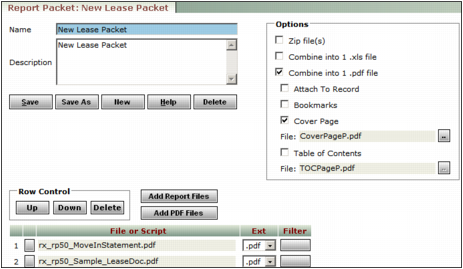
Complete the Options section, as needed.
|
|
9
|
Click Save.
|
|
10
|
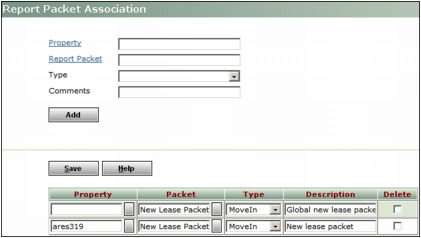
From the side menu, select Admin > Property/Report Packet Setup. The Report Packet Association screen appears.
|
|
NOTE If you want to associate the packet with all properties that are not associated with specific packets, leave this field empty.
|
|
|
12
|
Click Add. A new row appears in the table at the bottom of the screen.
|
|
13
|
Click Save.
|