You can add properties before owners or owners before properties, but you must have owner records set up before you can add owner information for a property. For information about adding owners, see “Adding Owner Records”.
|
1
|
|
|
|
3
|
|
|
For commercial properties, an MLA tab appears, for associating market-leasing assumptions with the property. For information about completing the tab, see “Assigning Market Leasing Assumptions to Properties” in the Voyager Budgeting and Forecasting User's Guide.
|
|
4
|
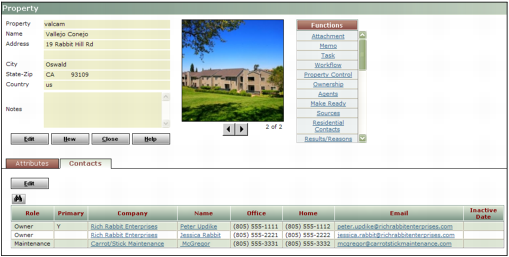
If you want to add photos, save GIF or JPEG graphics to the \Pictures folder in the default path specified on the Accounts and Options screen.
|
Name the file with the property code followed by an underscore, a sequential number, and the file extension. For example, if the property code is valcam, you would name JPEG files of the photo, valcam_1.jpg, valcam_2.jpg, and so on.
|
5
|
If you want to add contacts, click Edit on the Contacts tab and complete the Contacts screen that appears. For more information, see “Adding Contacts” in the Voyager Contacts, Notifications, and Workflows User's Guide.
|
|
a
|
|
|
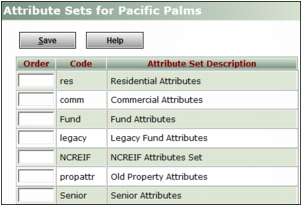
Your system administrator creates attributes and attribute sets. For more information, see “Property Attributes” in the Voyager Core Installation and Administration Guide.
|
|
c
|
Click Save and close the window.
|
|
d
|
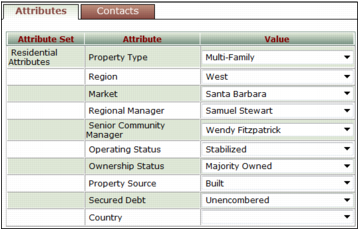
On the Property screen, click the Attributes tab if it is not in the foreground, and click Edit if the record is not in an editable state.
|
|
|
 -
-|
f
|
Click Save.
|
|
7
|
Click the Property Control link on the Functions menu and complete the Property Control screen. For field descriptions, see “Property Control Screen Reference”.
|
|
|
The Property Control screen defines dozens of defaults and parameters at the property level. Property Control settings override global settings defined on the Accounts and Options screen.
You must complete the Property Control screen before posting transactions for the property.
|
|
1
|
|
2
|
|
3
|
Click Edit if you want to change something. For field descriptions, see “Working with Property Records”.
|
|
4
|
|
|
Depending on which Voyager systems, modules, and features your license includes, some Property Control sections or fields may not appear on your screen.
|
|
|
In the Accounting Control field-description table, SETUP instructions are for use only during initial setup. Except on the advice of a Yardi support technician, do not change dates in the Accounting Control section after you have started using Voyager. Voyager updates these fields when it closes the month.
|
|
|
When you attempt to post a transaction, Voyager checks whether the transaction date is in the current period. If it is, Voyager posts the transaction. If the transaction date is not in the current period, the Access to Past Periods and Access to Future Periods entries on the User Security screen determine whether you can post the transaction. If not, an error message appears:
|
|
SETUP Complete this field with the currently open accounts-receivable month.
|
|
|
SETUP Complete this field with the currently open accounts-payable month.
|
|
|
SETUP Complete this field with the currently open journal-entry month.
|
|
|
SETUP Complete this field with the day of the week your leasing week begins, in the week that you will first use Voyager. For example, if you will start using Voyager on Friday, June 1, 2012, but your leasing week starts on a Monday, enter the Monday of that week: 05/28/2012.
NOTE Only users for whom the User Can Bypass Leasing Week Security check box is selected on the User Security screen can change leases added prior to the date in this field. For more information, see “Adding Users to Security Groups” in the Voyager Core Installation and Administration Guide.
|
|
|
SETUP Complete this field with the month for which monthly charges were last posted. Monthly posting uses the month and year from this field by default.
CAUTION Voyager updates this field when you create a monthly charge batch. Do not modify this field unless:
|
|
|
Date for lockout of performance tables. For more information, see “Locking Performance Tables” in the Performance User's Guide.
|
|
|
SETUP Enter a whole positive number between 1 and 28.
NOTE For Voyager to use this day, Implicit Post Month must be selected in the Data Entry section of the Environment tab on the Accounts and Options screen.
|
|
|
Native The property is not set up for intercompany accounting, or is the funding property for intercompany accounting.
Interco The property is the funded property for intercompany accounting.
|
|
|
SETUP Enter the number corresponding to the last month of the fiscal year for the property. For example, type 1 for January, 6 for June, or 12 for December.
|
|
|
Default option for user-defined segments on transactions for this property. In the graphic above, Department, Source, and Tenant are segments. For information about defining segments, see “G/L Segments”
|
|
|
NOTE When you attempt to post a transaction to an inactive property, Voyager displays the following message: “Warning: Bank account not defined or inactive for this property/cash account.”
|
|
|
NOTE This field is for informational purposes and does not affect whether Voyager can process transactions for the property. Voyager cannot post transactions to a property for which the Inactive check box is selected regardless of whether this field is empty or contains a date in the past or future.
|
|
|
NOTE You can use this feature to comply with Canadian laws or regulations requiring application of postdated cheques to newest charges first. See “Applying Postdated Cheques” in the Core User's Guide.
|
|
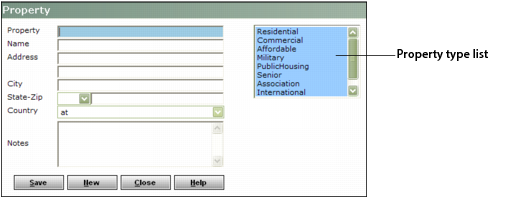
Your license determines the contents of this list, and not all options appear for all installations. You select the type when you add a property, but can change the type on the Property Control screen.
This selection affects which tabs appear on the Property screen and whether Voyager uses the Resident or Lease screen for tenants of the property. It also determines which unit Rental Types are available for the property. For information about rental types, see “Unit Screen Reference”.
NOTE If you select Affordable, Military Housing, Public Housing, or Student Housing, Voyager automatically selects Residential when you click Save, because these Voyager varieties incorporate the functionality of Voyager Residential.
Affordable U.S. Low Income Tax Credit (LITHTC), HOME, Rural Development Section 515, or HUD project-based housing.
Association Condominium, co-op, or homeowner association (HOA) properties.
Canadian Social Housing Rent Geared to Income (RGI), Local Housing Corporations (LHC), Subsidy Vacancy Tracking (SVT), and Ontario Coordinated Access.
Commercial Retail, industrial, and office properties.
International Properties located outside the United States or Canada.
Military Housing U.S. military housing including family housing, barrack housing, and Unaccompanied Personnel Housing (UPH).
Public Housing U.S. subsidized public housing or housing-choice voucher properties.
Residential Multifamily properties.
Senior Housing Independent-living, assisted-living, and dementia-care communities.
Student Housing Dormitories and other student housing.
|
|
|
Yes Only one tenant can occupy a unit during a rental period.
No (default) Multiple tenants can occupy a unit during a rental period.
|
|
|
Yes Voyager removes units from the availability list upon submission of an application.
No (default) Units remain available after submission of an application.
|
|
|
When the difference between the dates in the Notice Date and Move Out Date fields on the Notice screen is less than the number in this field, Voyager displays a message stating “# days notice required. OK to continue?” where # = the number in this field. You can click OK and accept the early notice, or click Cancel and change the move-out date before submitting the notice again.
|
|
|
Number of non-sufficient funds (NSF) checks a tenant can pass before being required to pay in cash or cash equivalent. The default value of 0 (zero) permits unlimited NSF checks.
Summary Receipt Batch The tenant name appears in red. Voyager displays the error message “payment must be marked as cash equivalent” if you attempt to save the receipt.
Detail Receipt Batch “Accept only cash equivalent” appears next to the Payment Method field. Voyager displays the error message “Accept only cash equivalent payment from this resident” if you attempt to save the receipt.
|
|
|
Basic You can replace an existing lease with a new one from the Resident screen without a proposal or approval. For more information, see “Basic Renewal Procedures” in the Residential User's Guide.
Proposals/Approvals You must create and approve a lease proposal to renew a lease. For more information, see “Proposal-and-Approval Renewal Procedures” in the Residential User's Guide.
|
|
|
Default number of months for leases for Residential or Affordable properties. This number appears in the Lease Term (months) field on the Rental Options tab of the Prospect Guest Card. For more information, see “Adding Guest Cards” in the Residential User's Guide.
|
|
|
Minimum number of months for leases for Residential or Affordable properties. If you enter a lease term with fewer months in the Lease Term (months) field on the Rental Options tab of the Prospect Guest Card, Voyager displays the message “Minimum lease term is # months,” where # = the number in this field.
|
|
|
None Adds the Lease Term (months) entry to the Lease From Date, allowing a lease to end in the middle of a month. For example, if the Lease From Date is 2/15/12 and the Lease Term (months) is 12, Voyager calculates the Lease To Date as 2/14/13.
EOM (EOM = End Of Month.) Ends the lease on the last day of either the month during which the lease would end if it were not rounded, or the preceding month, depending on Round to Prev EOM if Date On/Before setting. For example, if the Lease From Date is 2/15/12 and the Lease Term (months) is 12, Voyager calculates the Lease To Date as either 1/31/13 or 2/28/13.
Prev EOM Ends the lease on the last day of the month preceding the month that the lease would terminate without rounding. For example, if the Lease From Date is 2/15/12 and the Lease Term (months) is 12, Voyager calculates the Lease To Date as 1/31/13.
|
|
|
Day of the month which, if an unrounded lease would end on or before, Voyager rounds the Lease To Date to the last day of the preceding month. For example, if the Lease From Date is 2/15/12, the Lease Term (months) is 12, and the entry in this field is 15, Voyager calculates the Lease To Date as 1/31/13. Using the same Lease From Date and Lease Term (months), but with 14 in this field, Voyager calculates the Lease To Date as 2/28/13.
|
|
|
Whether the tax setting on the Unit Type screen applies for this property. If you select Yes, you must also complete the Tax Rate and Tax Charge Code fields. For more information, see “Adding Unit Types”.
CAUTION If you change this setting or the Tax Rate setting, click Update Lease to apply the new settings to the property.
NOTE Check the Unit Type screen for the property to determine whether the tax column appears. Tax is not included in properties for which the Property Type is Association, Commercial, International, or Military Housing.
|
|
|
Sales tax percentage for Unit Type charges.
NOTE For Voyager to apply sales tax for a unit-type charge, you must select Yes in the preceding Sales Tax field, and select the Tax check box for the charge on the Unit Type screen.
|
|
|
Updates the property to use revised Sales Tax and Tax Rate settings from this screen for taxable charges from the Unit Type screen.
NOTE Unit-type charges apply to applications and at move-in and move-out.
|
|
|
Charge code for sales tax on taxable charges from the Unit Type screen. Complete this field if the Sales Tax field is set to Yes.
|
|
|
CAUTION Use only either MTM Flat Fee or MTM Percent of Rent. If you complete both fields, Voyager uses only the MTM Flat Fee setting.
|
|
|
Charge code for premium charged month-to-month residents. Completing this field adds the Month to Month Premium field to the Lease Renewal screen for Residential and Affordable properties. If you manually add the premium when converting a resident to month-to-month, you can complete this field and leave the MTM Flat Fee and MTM Percent of Rent fields set to zero.
|
|
|
Fee charged residents who terminate their leases before expiration. The Early Term Fee Type field (below) determines whether this value is a flat amount or a percentage of rent. When this field contains an amount greater than zero, the Post Early Termination Fee check box appears on the Notice screen.
NOTE This option applies to properties for which the only selection in the Property Type field is Residential.
|
|
|
Flat The Early Term Fee number is a flat amount.
% of Rent The Early Term Fee number is a percentage.
For example, if the Early Term Fee number is 200, and the monthly rent is $1000, the early-termination fee would be $200 if you select Flat and $2,000 if you select % of Rent.
|
|
|
Name of organization that issues receipts. This overrides the default from the Vendor field on the Accounts and Options screen. A vendor record must exist for the name. See “Adding Vendors” in the Core User's Guide.
|
|
|
Country for electronic payment processing. See “ACH Property Country Format” in the Optional Parameters User's Guide.
|
|
Maximum number of expired leases for the month, for occupancy planning. When adding or renewing leases, you can click the Lease Expiration Count link next to the lease-to date to view the actual and target number of lease expirations for the period starting three months prior to and ending six months after the date in the lease-to field.
 CAUTION This feature is for information purposes only; it does not prevent scheduling a greater number of lease expirations than specified.
NOTE The Lease Expiration count link appears on the Rental Options, Move In, Assign Unit, Lease Proposal, or Lease Renewal screen. The Lease Expirations screen appears.
For more information about lease renewals, see “Lease Renewals” in the Voyager Residential User's Guide.
|
|
|
With the exception of Lease Denial Letter, Voyager no longer uses the fields in this section. See the cross-references in the following table for information about current ways to create lease documents, renewal letters, and move-in statements.
|
|
This field must be clear for Voyager lease-document feature to work. See “Lease Document Setup” in the Residential Setup and Administration Guide.
|
|
|
Voyager no longer uses these fields. See “Lease Renewals” in the Residential Correspondence User's Guide for information about using the correspondence feature to create renewal letters.
|
|
|
Voyager no longer uses this field. See “Setting Up Lease Documents with Report Packets” in the Residential Setup and Administration Guide for information about creating report packets.
|
|
|
Text-file template for lease-denial letters. The file must be in the report path specified on the Accounts and Options screen. Voyager generates a lease-denial letter when you click Denial Letter on the Application Status tab of the Prospect Guest Card after denying a lease.
|
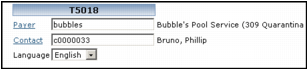
• T5018
|
|
For reporting amounts paid to subcontractors on a T5018 form by Canadian organizations using Construction Management. For more information, see “T5018 Procedures” in the Construction Management User's Guide.
T5018 reporting requires completion of the Tax Information section of the Vendor screen for subcontractors. For information about vendor setup, see “Vendor Procedures” in the Core User's Guide.
|
|
If the T5018 payer is the same as the vendor specified in the Vendor field in the Retention Distribution section of the Default Accounts tab on the Construction Accounts & Options screen, leave this field empty.
|
|
|
If you completed the Payer field (above), and the contact is the default contact for the vendor specified in that field, leave this field empty.
If you did not complete the Payer field, and the contact is the default contact for the vendor specified in the Vendor field in the Retention Distribution section of the Default Accounts tab on the Construction Accounts & Options screen, leave this field empty.
|
|
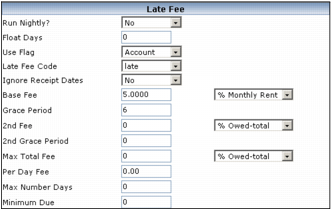
• Late Fee
|
|
The Late Fee section on the Resident screen overrides the late-fee information added in this section.
|
|
Yes An automatic nightly procedure posts late fees.
No (default) You will manually post late fees.
NOTE Automatic nightly posting requires setup of the late-fee stored procedure by a system administrator using Task Runner. For additional information, see “Parameters for Other Step Task Templates” in Task Runner APPTASK ClassNames and URL Parameters.
|
|
|
NOTE For late-fee purposes, days start at noon and end at 11:59:59 a.m. For example, January 4 starts at noon January 4 and ends at 11:59:59 a.m. January 5.
System Date January 5, 3:00 a.m.
Adjusted System Date January 4 (because 3:00 a.m. is before noon)
Late Fee Date January 1 (4 -- 3 = 1)
Result Payments processed at 3:00 a.m. on January 5, but due by January 1, are not late.
|
|
|
NOTE This setting applies only to commercial tenants.
Account Late fees apply only to charges to G/L accounts for which the Subject to Late Fee check box is selected on the Account Info screen. For information about setting up G/L accounts, see “Adding, Reviewing, and Editing Individual G/L Accounts”.
Lease Charge Late fees apply only to rent lease charges for which the Subject to Late Fee check box is selected on the Rent Schedule screen. For information about the Rent Schedule screen, see “To add a rent schedule” in the Commercial User's Guide.
|
|
|
Yes If a charge is paid in full before late-fee processing, Voyager does not charge a late fee even if the receipt date is after the due date and grace period. Voyager applies a late fee to the outstanding amount for partially paid charges.
No If the receipt date is after the due date and grace period, Voyager charges a late fee.
|
|
|
% Owed-total Percentage of total outstanding charges.
% Monthly Rent Percentage of rent charges.
Flat Amount Amount of late fee.
% Owed-month Percentage of outstanding charges for the current rental period.
|
|
|
NOTE Voyager includes the due date in the grace period.
|
|
|
For example, if the Base Fee is 3 %Monthly Rent, the 2nd Fee is 3 %Monthly Rent, and the rent is $3,000, the late-fee charge is $180 if both fees apply. If the Max Total Fee is $150 Flat Amount, however, Voyager charges the entire first late fee ($90), but only $60 of the second late fee. On the Late Fee screen, the Notes field for the second fee includes the following: “Maximum $60.00, less $90.00 prior billing.”
NOTE Voyager charges per-day late fees separately and does not include them in the Max Total Fee calculation.
|
|
|
|
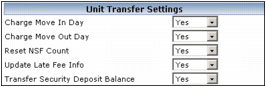
The first four settings in this section override global settings made on the Accounts and Options screen. For information about setting global move-in/move-out defaults, see “MoveIn/MoveOut”.
|

|
Yes Calculates rent based on the number of days that the unit is occupied in a month.
No Tenants pay a full month's rent regardless of move-in and move-out days.
|
|
|
Yes Voyager prorates using a 30-day month, regardless of the actual days in the month. For example, a resident who moves out on the 27th of June will be charged the same as a resident who moves out on 27th of February or the 27th of December.
No Voyager prorates using the actual number of days in the month.
|
|
|
Yes Includes the move-in date in the prorated period. For example, if the move-in date is January 4, the prorated period would be January 4--31.
No Does not include the move-in date in the prorated period. For example, if the move-in date is January 4, the prorated period would be January 5--31.
|
|
|
Yes Includes the move-out date in the prorated period. For example, if the move-out date is January 25, the prorated period would be January 1--25.
No Does not include the move-out date in the prorated period. For example, if the move-out date is January 25, the prorated period would be January 1--24.
|
|
|
If Prorate Rent in the Move In/Out section is set to Yes, this setting overrides the Charge Move-In Day setting for move-ins due to unit transfers.
Yes Includes the move-in date in the prorated period. For example, if the move-in date is January 4, the prorated period would be January 4--31.
No Does not include the move-in date in the prorated period. For example, if the move-in date is January 4, the prorated period would be January 5--31.
|
|
|
If Prorate Rent in the Move In/Out section is set to Yes, this setting overrides the Charge Move-Out Day setting for move-outs due to unit transfers.
Yes Includes the move-out date in the prorated period. For example, if the move-out date is January 25, the prorated period would be January 1--25.
No Does not include the move-out date in the prorated period. For example, if the move-out date is January 25, the prorated period would be January 1--24.
|
|
|
Whether to reset the non-sufficient funds (NSF) count for a tenant upon unit transfer. Yes resets the count to zero.
|
|
|
Yes New record uses late-fee defaults from Property Control screen.
No New record uses late-fee settings from previous resident record.
|
|
|
Whether you can select the Include Security Deposit Balance in Transfer check box on the Transfer Unit screen.
Yes You can select the check box during unit transfer. If selected, Voyager transfers deposit balances from the ledger for the previous resident record to the ledger for the new resident record when you process deposit accounting. You can clear the check box if you do not want to transfer the balance.
No The Include Security Deposit Balance in Transfer check box is unavailable.
|
|
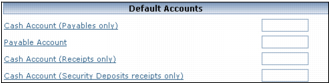
If the property uses the Cash account from the Essential Accts tab of the Accounts and Options screen, you can leave this field empty.
|
|
|
If the property uses the Payable account from the Payable Accts tab of the Accounts and Options screen, you can leave this field empty.
|
|
|
If the property uses the Cash account from the Essential Accts tab of the Accounts and Options screen, you can leave this field empty.
|
|
|
If the property uses the Cash account from the Essential Accts tab of the Accounts and Options screen, you can leave this field empty.
|
• Chart
|
Chart of accounts for the property, for use if your database is configured to use multiple charts of accounts. For information about setting up a chart of accounts, see “Chart of Accounts”.
CAUTION Do not change the chart of accounts after adding financial information for the property. If you created the property with the Copy Property feature and included security deposits or beginning balances, the property has financial information; do not change the chart.
|
See “Setting Up Maintenance Control Parameters For Properties” in the Maintenance Management User's Guide
For Affordable, see “Affordable Housing Property Control Setup” in the Affordable Housing User's Guide.
For Public Housing, see “Adding Control Information for Subsidized Properties” in the Public Housing User's Guide.
