For information about ordering Voyager-compatible check form stock, see Appendix A, “Service and Products.”
For more information about installing yCheck, see “Installing Yardi yCheck” in the Voyager Core Installation and Administration Guide.
|
1
|
From the Voyager side menu, select Setup > System > Review Bank Account. The Bank Account filter appears.
|
|
2
|
|
3
|
|
|
If you print on blank stock, see “To add a bank account” for information about setting up MICR data for the bank account.
|
|
|
|
5
|
|
6
|
|
7
|
|
|
|
|
|
|
If you use another location, you must include the path in the Text or Bitmap field in the following step, and you must specify the location of the file on the yCheck Write Check screen.
|
|
b
|
|
c
|
On the screen that appears, click the Background Text tab.
|
|
d
|
In the first empty Text or Bitmap field, in braces, type the file name of the graphic or, if the graphic is located somewhere other than the yCheck folder, the path and file name. For example:
|
Graphic in yCheck folder {signature.bmp}
Graphic in other location {\\CorpServ\SharedFiles\signature.bmp} or {Q:\CorpServ\SharedFiles\signature.bmp}
|
|
|
5
|
|
6
|
Click Save, and close the screen.
|
|
|
If the graphic is located somewhere other than the yCheck folder, you must indicate this on the yCheck Write Checks screen by setting the Bitmap Location to UNC and completing the Location field with the path to the file, for example,\\CorpServ\SharedFiles\signature.bmp.
|
|
1
|
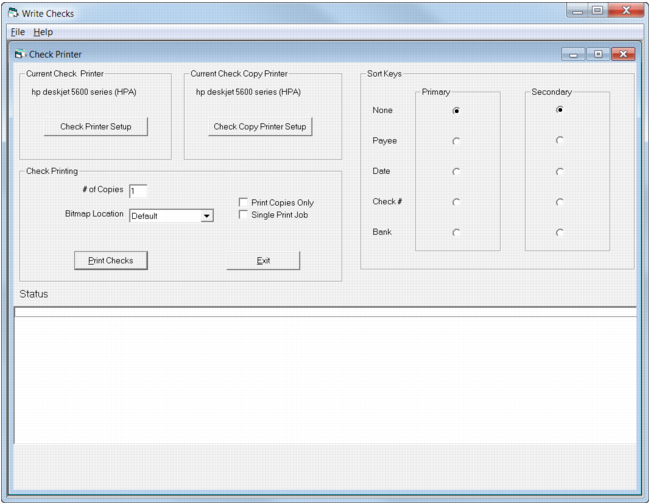
From the Bank Account Info screen, click the Test Check link. The yCheck Write Checks screen appears.
|
For information about reaching the Bank Account Info screen, see “To review or edit a bank account record”.
|
|
Yardi yCheck must be installed and set up before you can test check printing. For more information, see “yCheck” or “Installing Yardi yCheck” in the Voyager Core Installation and Administration Guide.
|
|
2
|
If you need to review or modify printer setup, click Check Printer Setup. Return to the Write Checks screen when finished.
|
|
3
|
If your check includes a signature or other graphic, and the file is located somewhere other than the yCheck folder, set the Bitmap Location to UNC and complete the Location field with the path to the file, for example, \\CorpServ\SharedFiles\signature.bmp.
|
|
|
|
5
|
Click Print Checks.
|
|
1
|
|
2
|
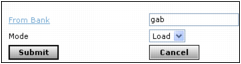
Click the Check Format link on the Data menu. The Check Format screen appears. For field descriptions, see “Check Format Screen Reference”.
|
|
3
|
|
4
|
In the From Bank field, type or select the code for the bank account you want to copy the check format from.
|
|
5
|
Choose the Mode:
|
|
Links the check-format information in the current record to the check-format information in the linked-to record. When this option is selected, a statement at the top of the screen indicates, This bank is currently linked to [name and description of linked-to bank record]. Click here to remove the link. Changes to formatting for the linked-to account apply to all linked accounts. You cannot make changes to a linked-from account without removing the link. This option is useful for accounts with identical check formats.
|
|
6
|
|
7
|
|
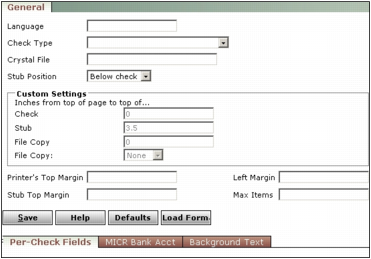
Displays the language selected on the Bank Account Info screen.
|
|
|
If you use Crystal Reports to format your checks, select Crystal and see the description for the Crystal File field below.
|
|
|
File containing Crystal Reports check formatting information. This field appears only if the Check Type is Crystal.
The Crystal file must be located in the default path location specified on the Accounts and Options screen. The default Crystal Reports check format file is rs_Crystal_Check.txt, but you can use a file with a different name. For information about creating a Crystal Reports check formatting file, contact Yardi technical support.
|
|
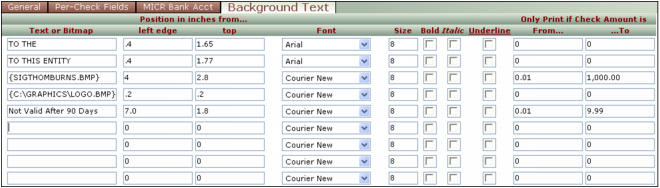
Most of the following fields appear on all three tabs. The Text or Bitmap and Only Print if Check Amount is fields appear only on the Background Text tab.
|
Text Text that should appear on the check.
Bitmap The bitmap file name in braces, for example, {signature.bmp}.
|
|